Hello all! I am writing to you from my extended vacation home in the non-extraditable tundras of Coerthas! Last time we spoke, I got to show you all the wonders of this frigid and uninviting land and its people! I had hoped they might let me into Ishgarde, but alas, the Elezen of Coerthas have hearts as icy as the corpses of dragons they leave strewn across vista after vista after vista….
It’s really gross and probably unsanitary! But that’s not why I am here! No, in my exile, I have been unrelenting in pursuing a way into the wondrous city of the north and have recently resorted to blasting away at its walls with a trumpet!
In fact, all the noise has got me interested in, you guessed it, music! But I can only get so much pleasure from blaring horns at a city in hopes of convincing them to let me in. No, I am afraid that it has given me a bug that follows me all the way back to my happy little camp! Admittedly, there is not much reason to share this hobby! It is very niche and not useful for any reason, ever!
Still, hobbies can be fun, even if there is no point in doing them. And is fun ever not worth it? So today, let’s learn how to drastically change music from a powerful range of notes into something that fits within a three octave range!
Now, like I said, there is no reason any sane person would want to do this. Cutting a song into such a limited range serves no real purpose, but it can still be an excellent creative release! Plus, some of us without a home proper, myself included, are forced to use travel instruments, and because of that the range can be limited. So by rearranging songs, they can be played by those with smaller instruments! Here’s a photo of mine!
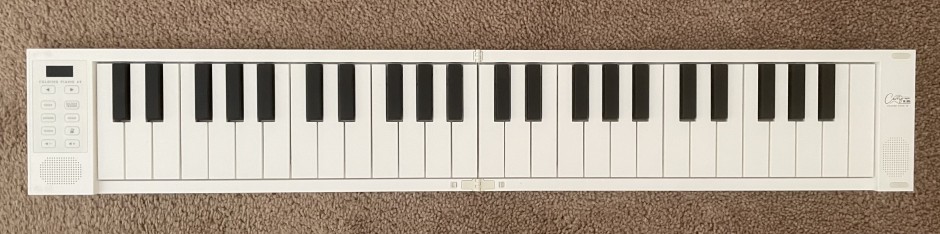
You may notice that it DOES have four octaves, but even so, my hands are small so it can be difficult to make use of that extra set of keys!
First, we need to take a look at the tools we will be using! Are you worried about not being able to read sheet music? Well put those worries in a box and bury them far below the surface that they may never be seen again. If you have any self-doubt or other emotional issues, now might be a good time to toss those in the hole as well!
For this demonstration, we will be using MidiEditor, but if you have a different program you enjoy using, you should be okay to follow along with that, for the most part!
Next, we will be picking a song to try to mangle a little! If hurting music makes you squeamish, do not fret. The songs themselves are actually harder to tarnish than you might imagine, and for the purposes of this hobby, you will not be doing anything to hurt them overall!
There are many places to find delightful, classic royalty-free, public domain songs, as a quick aethernet search will surely prove. For the purposes of this demonstration, we will be working with Mozart’s Piano Sonata No 8 Major, K. 311 Allegro con Spirito, as found here. If you do choose another piece, you may find that it looks different, but the same lessons that we go over here will still apply to whatever it is you are working on!
When you can, load it up in MidiEditor and we will go over some of the screens and functions! To start, let us look at some important buttons on the toolbar!!

1. Open! This is what you will want to use to bring up a file. You might notice that my MidiEditor is filled with various colorful bars! That is because I have opened our selected file already. If yours is blank, use that “Open” button and fill it in!
2. Mouse Selector! This is the default setting, I believe, and it is a very important one for manipulating songs. This simple item allows for the most precision selections, including drag and drop, as well as individual note selection.
Here are some fun tips! If you have some notes selected and want to grab more, holding the “Shift” key down allows you to add to a selection. If you accidentally grab too many notes, you do not need to drop everything! Simply hold down “Shift” and “Ctrl.”
3. Zoom Buttons! You may feel that the current level of zoom is too much, or not enough. These buttons are for you! “+” for zoom in and “-” for zoom out, but you might notice there are four total. The two on the left Bring you further or closer to the notes, making them appear longer or shorter, depending. The two buttons on the right, however, control the zoom levels on the keyboard, making the field appear either taller or thinner. Find some levels that work for you! You want to be able to see what you are doing and grab onto notes, so this is an important tool to be aware of!
4. Finally, the Magnet tool! This might not seem that important, but it really can be. When you are moving notes, you might make the mistake of getting them out of place. The magnet too allows notes to easily snap to the vertical lines shown in the note field. This means, if you have lost place of something, you can more easily align it to what it should match with. While not 100% accurate, it can still be helpful to have! Though, really, if you end up making a mistake, it can be simple to undo that with a “ctrl+z” command, also available under the “Edit” heading.
Next, we should go over tracks, as that is what you will be working with the most!
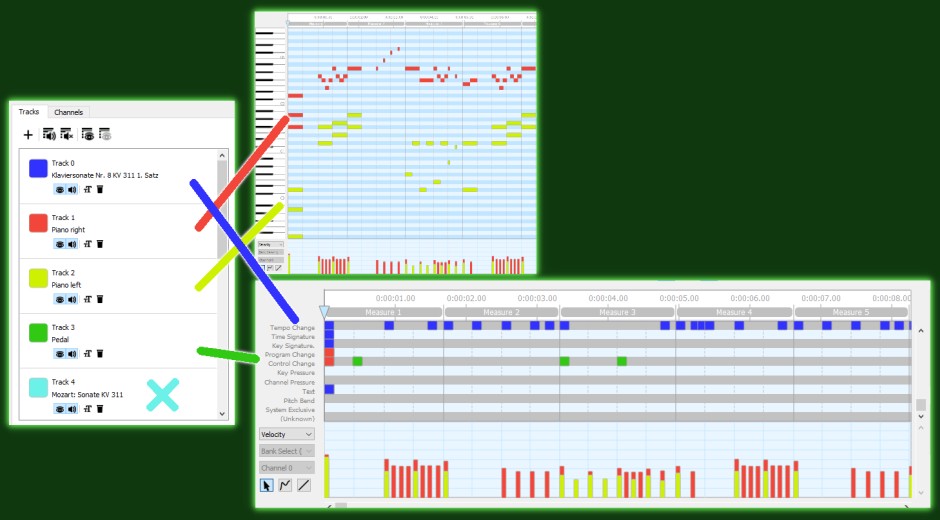
You may have picked up on this already, but the different tracks are assigned different colors! What does this mean? Well, a track is either the music itself or some additional data to help the song play properly. We will do a quick rundown of the tracks in this file to give a better understanding, but it should be mentioned that a track is specifically for ONE musician.
With multiple tracks, you would either need to combine the tracks or find a partner to help you fully realize what you are trying to play. Even in the case of a piano piece, such as this, since the left and right hands are separated, it would necessitate combining the two hands into one track for a solo player to perform the whole piece.
Tracks can be different things in different song files, so be aware this is not a strict guideline, but rather a general overview to help you know what to look for!
Track 0 - Blue
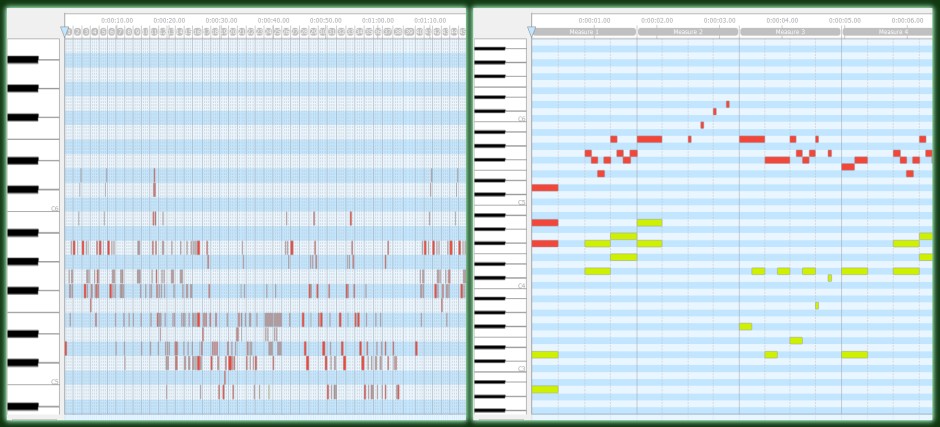
In this file, the blue lines represent exclusively additional data necessary for the song to run. Specifically, Tempo Change, Time Signatures, and Key Signature. These can be found by scrolling from the note field all the way down. Typically, we do not want to touch those three items. They are important parts and if they were to suddenly disappear, the song would change quite a bit.
However, when it comes to other sections like “Program Change” or “Control Change,” these can be less important. Program Change is something that allows the instrument type to change mid-song, a feature not used by most, save those who enjoy electric guitars. Control change refers to note manipulation, how hard or soft it is being played, and things of that nature. For our purposes, it is not needed, but we will leave them be.
Track 1 & 2 - Red & Yellow
These tracks are the notes. As mentioned before, this piece is intended for a single person to play, however, it was arranged to show notes for both the left and right hand. For our demonstration today, we will be seeking a final piece that combines these, but for now just know that if you were to find a piece with multiple tracks, each one would be intended for a different person.
Track 3 - Green
For this piece, interestingly, this track is exclusively relegated to working the control change for the notes, acting as the piano’s pedal. For what we are doing, this does not matter, but it is a neat thing to see, just as an aside. Control change can be tied to the track notes themselves (in this case, Tracks 1 & 2) so that they are not is perhaps a little unusual.
Track 4 - Ice Blue
This track exists in this piece simply to provide some additional information about the song itself. All that is filled out for it is the track name, with no other information. It is harmless but serves no real purpose for making music. We will leave it alone for now, but you are welcome to delete them if you would like!
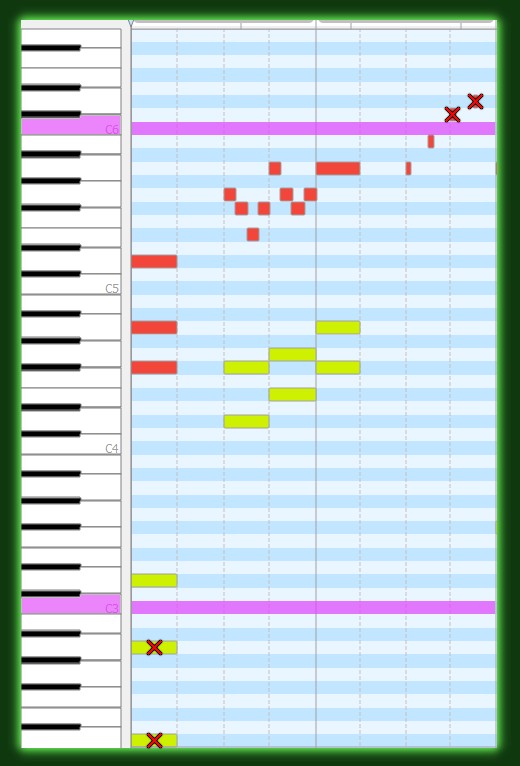
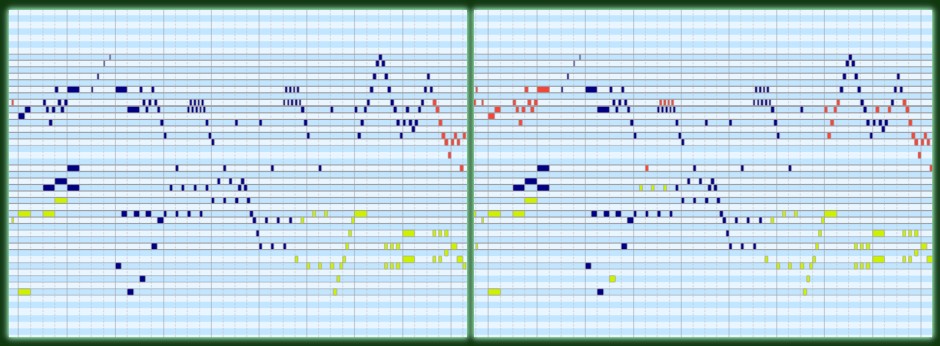
Finally, before we really get into things, we should understand the range we are sticking to! In the above image, the top and bottom pink lines are the boundaries. Notes can be in these lines, but anything outside of them will not show up in our final products. You might notice that both red and yellow notes are outside of these boundaries. I have marked them with red Xs to signify they are out of range.
We need to make sure we are keeping things in this range, but it is important to understand that we do not want to change things TOO much. Despite being higher and lower, C3 and C6 are the same C sound, just in a different pitch. The same goes for all the notes. So rather than simply moving things down to keep them in range, we need to move them down y a specific number of notes.
Typically, that number is 12, as (including the black keys) there are 12 keys in between each octave. If you are brave, you can do this by selecting a group of notes and then dragging them down to their new spot, but to keep things even more simple, we can transpose by a set amount. This also reduces the risk we will accidentally shift the placement of the notes along the time axis. To transpose more automatically, press “ctrl+t” then type in 12 in the text box, followed by up or down, depending, and then press “Accept.”
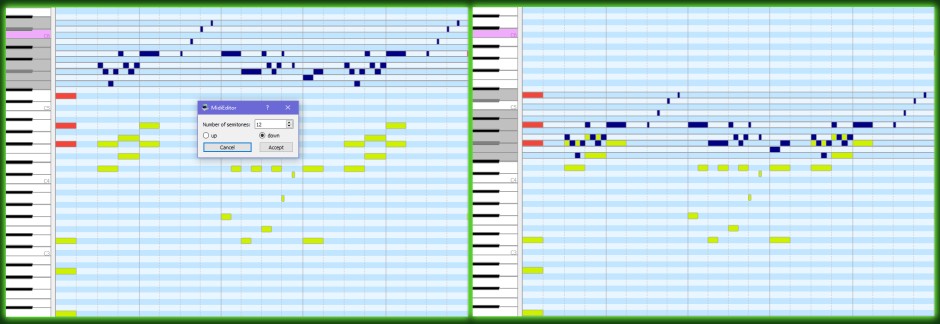
As you can see, it moves the selected notes down 12! But we have another issue to address now. A few, actually! This has to do with spacing. If notes are so close together, it can create an unpleasant and muddled sound. So, we must now move over to Track 2 to make some adjustments fr the newly moved Track 1 notes! Spacing is a bit of a contentious issue.
The generally accepted rule of thumb is to have no more than 3 notes starting at any one time. However, this can be limiting. If you are unsure, stick to that principle, but if you feel adventurous, you can bypass it with some interesting spacing techniques, going as far as 5 notes at a time if you really want!
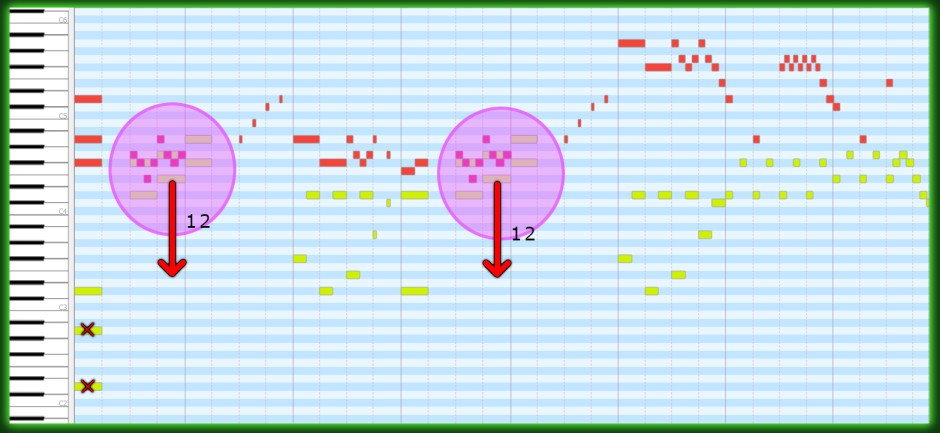
To solve for this a little, you’ll notice the song starts off with 6 notes, 2 of which are out of our target range. We are going to delete those as they will end up being redundant, anyway. That leaves us with 4, all in range.
Next, we will take those yellow Track 2 notes that clash directly with the red and more them - and ONLY them - down 12! I have highlighted in pink to show what I mean, but you can also see the end result in the following example. If you are working alongside this guide, you should have a start that looks something like this!
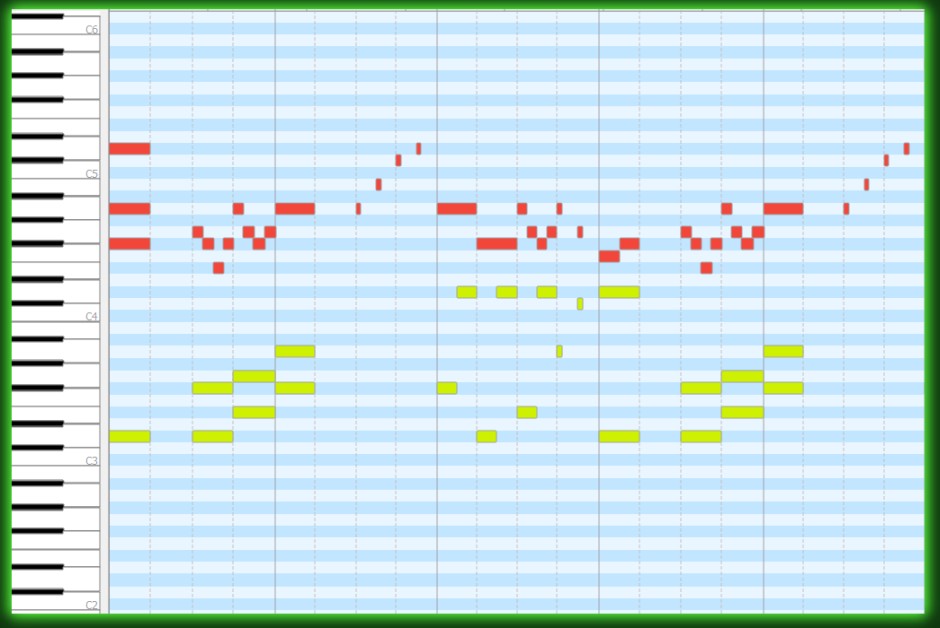
You SHOLD proceed with the rest of the song like that, moving things in chunks, rather than individual notes! It can make a song feel awkward to have a singular note out of pitch with the rest in its group.
But, oh no! Just a few bars later and that exact problem looks like it might be showing its face! AND more troubles with spacing!! Not to worry, though, with some unusual transposition, we can make this acceptable for a single musician!
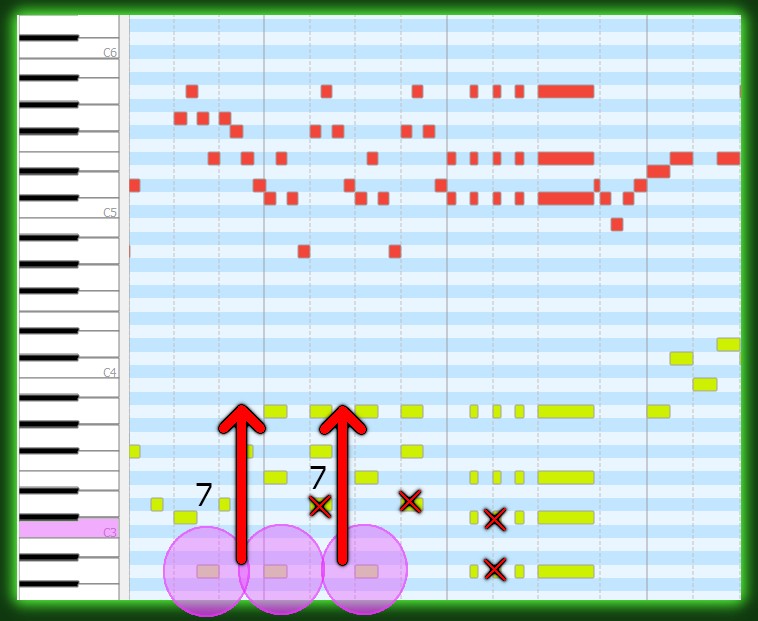
Looking here, we have quite a few notes in certain places and a few that are too low to be in our octave trio. First, let’s take care of the too-many-notes issue. If you look at Tracks 1 and 2, you will notice that there are a few sections playing chords. This WILL make the song choppy if we don’t address this, so we are going to have to make some cuts here. Typically, you want to remove notes that are repetitive.
For example, if you have C6, C5, C4, and C3, you can take out the C4 without much issue as the lower and higher ranges will make up for the missing middle - C is the same note but the higher and lower pitches together will fill-in-the-blank somewhat for the missing C4. In our case, Track 2 has additional lower pitch notes that we won’t need, so we will go ahead and cut them out. The higher pitch chords will give us that full sound so the Track 2 notes really only need act as a bass.
Now the other issue… The lower Track 2 notes SHOULD provide bass here, but if we do not move them up, it will sound hollow in some parts as a few notes are out of range. Then again, raising EVERYTHING will give the bass less impact. So we want to strike a balance. This rule is not a perfect one, so you may want to use it sparingly, but in this particular case, I think it should work fine.
The notes that are below the threshold can be moved up 7 keys (NOT 12) and keep the integrity of the song intact. This is because the 5 key difference in a note is usually in a melodic range and does not affect the overall feel of a song. This is a trick that you should reserve for lower sections, rather than higher ones, as with higher notes it can change the feel of a song quite a bit. The end result should look like this:
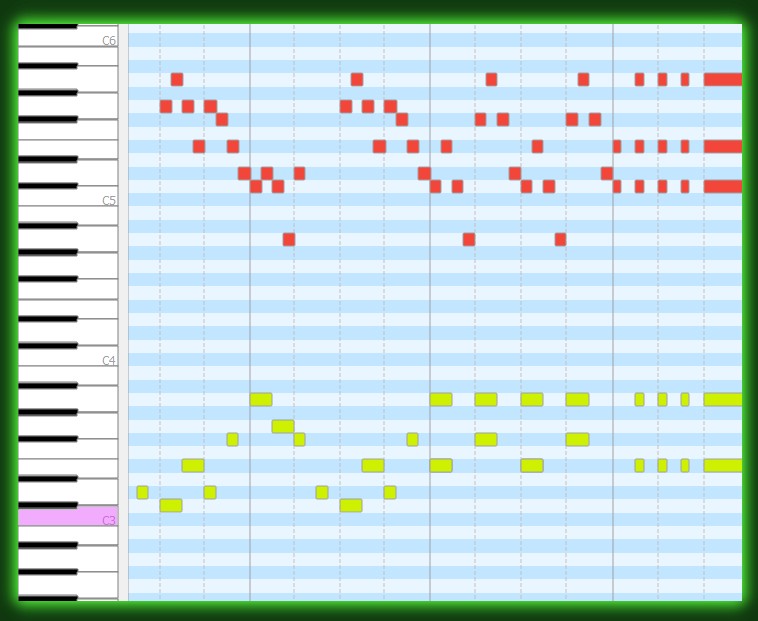
And that is, really, all there is to it! The rest of the song can be conformed into our end goal using these rules! So get to it! Then, when you’re done, you can either play both tracks simultaneously, or send everything to a single track, labelled “piano!”
(audio)
The rest is just practice and experimentation! There are some principles to stick to, such as keeping things in key (out-of-tune songs make everyone suffer) but as long as EVERYTHING is in tune, you can make interesting creative decisions to make most songs fit your designs!
Good luck to you, fellow musical hobbyists! I hope you enjoyed this lesson in something that is completely useless to anything and will never help you ever as it is strictly something or your own enjoyment and not something that might help you around Hydaelyn ever! Keep blasting those walls! P’pol out!